How Important Is a Built-In Camera for a Laser Engraver?
One common mistake many people make when buying a laser engraving machine is that they tend to fixate on wattage, bed size, and price. The camera gets treated as a nice-to-have: something you can live without. In practice, however, an in-built camera can be one of the most important features to have on your laser engraver.
In general, an in-built camera on a laser engraving machine works like a workflow multiplier: it doesn't change what the laser can cut, but it changes how quickly, safely, and accurately you can get from idea to smooth execution. However, an inbuilt camera is not a must-have feature in all cases: the usefulness of an inbuilt camera varies depending on the type of laser engraver you have, the engraving software you are running, and the material you are working on.
So, exactly how important is an in-built camera for a laser engraver, and when do you need it the most? Let's walk through exactly why a camera matters, when it doesn't, and how to choose the right setup for your workflow.

5 Key Benefits of an In-Built Camera For a Laser Engraver
1. It significantly improves your visual placement.
An inbuilt camera is crucial for appropriately placing your items when engraving. When you use laser engraving software like LightBurn, the camera feature overlays a live image of your bed directly into your design workspace.
So, instead of having to eyeball your measurements, taping down rulers, or running test fires to find your origin point, you simply drag your design on-screen until it sits exactly where you want it on the physical material. What used to be a slow, manual framing process, often involving several aborted test runs, becomes a matter of seconds.
2. It Helps You Get Real Value Out of Your Crap and Offcuts.
Usually, nobody wants to throw away a beautiful offcut of walnut or a leftover leather hide just because its edges are irregular.
A camera shows you precisely where that odd-shaped material sits under the laser head, so you can nest your design onto the usable area instead of guessing and hoping. Over time, this will add up to real material savings, especially with anything that isn't cut into a perfect rectangle.
3. It Improves Safety and Remote Monitoring.
The laser engraving process carries its own genuine fire risk, particularly with wood, acrylic, and other flammable materials during longer jobs. A camera lets you monitor a running job from across the room, from your phone, or even from another part of the house, without needing to stand directly over an active beam or crane your neck to check progress.
It turns laser monitoring from a physically demanding chore into something you can do safely and comfortably.
4. It Helps With Faster Iteration for One-off and Custom Work.
Beyond the three core benefits above, a camera dramatically speeds up any workflow involving repeat customization: think personalized tumblers, one-off gifts, or small-batch production where every piece is slightly different.
Instead of resetting jigs or re-measuring for each item, you place the object, glance at the live feed, and adjust the design position on-screen.
5. It Reduces Material Waste from Misalignment.
A camera also speeds up any job involving repeat customization, personalized tumblers, one-off gifts, or small batches where every piece is a little different. Instead of resetting a jig or re-measuring for each item, you place the object, check the live feed, and adjust the design position on-screen.
In short, a built-in camera saves you time on nearly every job, protects you from wasting expensive materials, cuts down on the physical risk of standing over a running laser, and makes irregular or one-off work far easier to handle. For most buyers, that's enough to justify the extra cost on its own.
 Laser Engravers: With vs. Without In-built Cameras
| Feature | Laser Engraver with Built-In Camera | Laser Engraver without Camera |
| Material Alignment | You can drag-and-drop positioning using a live view for precise placement. | Manual alignment is required using rulers, jigs, or test fires. |
| Accuracy | High accuracy, especially on irregular or pre-made items. | Depends on manual measurements and setup. |
| Setup Time | Faster job setup with minimal adjustments. | Slower setup with more trial and error. |
| Material Waste | Lower waste by reducing alignment mistakes. | Higher chance of ruining materials through misalignment. |
| Scrap & Offcuts | Easily engrave odd-shaped scraps and leftover materials. | Difficult to position designs on irregular pieces. |
| Personalized Projects | Excellent for one-off gifts and custom products. | Each item often requires manual repositioning. |
| Production Workflow | Speeds up mixed-batch and custom production. | Better suited for repetitive jobs with fixed jigs. |
| Remote Monitoring | You can monitor engraving progress from a distance. | Requires checking the machine in person. |
| Software Experience | Best with camera-supported software like LightBurn. | Works well with any compatible software but lacks visual alignment features. |
| Learning Curve | Easier for beginners thanks to visual positioning. | Requires more experience with manual machine positioning. |
| Best For | Custom engraving, expensive materials, irregular shapes, and small-batch production. | Mass production of identical parts, uniform sheet materials, and budget-conscious users. |
| Cost | Higher initial investment. | Lower purchase price. |
How a Camera Helps with Software Integration (Specifically LightBurn)
Here's the part that catches a lot of new buyers off guard: a built-in camera isn't automatically useful. Its value is entirely dependent on the software you pair it with. Buying a camera-equipped machine and then running the wrong software is like buying a car with a backup camera and never turning the screen on.

1. LightBurn
LightBurn is the closest thing the hobbyist and small-business laser world has to an industry standard, and it's built around making camera input genuinely useful. Once you calibrate your lens, LightBurn overlays a live, corrected video feed directly onto your digital workspace grid. This unlocks a few things:
- Precise placement on odd-shaped or already-cut material, without physical jigs or rulers.
- The Trace feature, which lets you photograph a physical sketch or drawing sitting on the bed and convert it into an editable vector file, turning a hand-drawn design into a cuttable path in minutes.
- Repeatable calibration, so once you've corrected for your lens's distortion, that calibration holds for future jobs.
If you're running LightBurn, a camera isn't a luxury; it's arguably one of the most important accessories you can add.
2. Proprietary and closed ecosystems (Glowforge, xTool Creative Space, Laserbox).
For these platforms, a camera isn't optional at all; it's the interface. These machines are designed around simplicity, often without physical control panels or manual positioning tools. The camera feed is how you interact with the bed. If you're buying into one of these ecosystems, you're buying a camera whether you think about it or not, so it's worth confirming the model you choose has one built in.

3. Basic and open-source software (LaserGRBL).
This is where expectations need adjusting. LaserGRBL is a capable, free tool for driving diode lasers, but it wasn't built with live camera overlay in mind. You'd be viewing your camera feed in a separate window rather than seeing it integrated into your workspace grid, which defeats the entire purpose of drag-and-drop alignment.
If LaserGRBL is your primary software, a camera is close to dead weight, and that money is better spent elsewhere on your setup.
Before you pay extra for a camera-equipped machine, check which software you'll actually be running. The camera and the software are a package deal; one is useless without the other.
Laser Engraving Different Materials: When Do You Need an Inbuilt Camera?
It is also important to keep in mind that not every job benefits equally from a camera. Your choice of laser engraving material, and how much that material costs you if you get it wrong, is one of the biggest factors in deciding how much value you'll get out of one.
 Engraving Irregular Shapes and Scrap Pieces: Highly Important
- Live edge wood, leather hides, scrap cuts: Highly important. Organic or leftover materials have highly unpredictable boundaries. A camera allows you to overlay your design onto the exact usable area of a leather scrap or a winding piece of live-edge wood without wasting a millimeter.
- Standard 12x12 sheets: Low Importance. If you exclusively cut uniform, pre-cut rectangular sheets of plywood or acrylic, you can easily use physical corner jigs or absolute machine coordinates instead of a camera.
Material Costs
- High Importance (Pre-made blanks, precious woods, expensive plastics): Missing your target on a £50 leather bag, a custom cutting board, or an expensive piece of slate means ruining the entire item. The camera acts as an insurance policy against misalignments.
- Low Importance (Cardboard, Cheap MDF): If you are prototyping on cardboard or cheap draft board, an alignment mistake costs cents, making the precision of a camera less critical.
Production Volume and Batching
- High Importance (Mixed Batches and Personalization): If you constantly switch between engraving phone cases, wallets, and flasks, a camera lets you throw them on the bed and align them instantly.
- Low Importance (Mass Production of One Item): If you are engraving 500 identical coasters, you are better off cutting a physical wooden jig to drop the pieces into. A jig is faster and more precise than a camera for repeating the same job.
Bottom line: the more irregular, expensive, or varied your materials are, the more a camera will save you. The more standardized and low-cost your materials are, the less it matters.

Computer Operating Systems: Why An In-Built Camera Changes Things
This is a detail that rarely makes it into buying guides, but it matters: your operating system directly affects which software you can run, and by extension, how smoothly your camera will actually work.
- Windows: Offers the highest compatibility with a camera. You can run LightBurn, LaserGRBL, and all proprietary manufacturer apps (like xTool Creative Space). Camera drivers are universal, making it the easiest OS for setting up third-party USB webcams.
- macOS: Highly compatible with LightBurn and proprietary apps, but completely locks you out of free, basic tools like LaserGRBL. If you are a Mac user, you must also occasionally deal with security permissions for USB camera access or use USB-C adapters that can sometimes drop connection frames.
- Linux: LightBurn natively supports Linux (Ubuntu), but camera setup can be highly technical. Gaining the correct user permissions (v4l-utils) to access USB camera feeds often requires using the command-line terminal. Proprietary manufacturer software hardly supports Linux.
If a smooth camera experience matters to you, factor your OS into the buying decision before you buy the machine, not after you've already discovered your preferred software doesn't support your platform.
Standard Webcams vs. Specialized Lenses: What Does LightBurn Actually Need?
- If you're going the DIY route, LightBurn is refreshingly flexible: it supports almost any USB webcam. But "supports" comes with a catch: you'll need to manually calibrate it to correct for fisheye distortion, since most webcam lenses are wide-angle and bend straight lines near the edges of the frame.
- Closed-system brands take a different approach entirely. Instead of relying on a generic webcam, they build custom wide-angle or dual-camera setups that are engineered specifically for their bed size and mounting height.
If you're comfortable with a bit of setup work and want the flexibility to use whatever webcam you already own, LightBurn's manual calibration route works fine; it just costs you some time upfront. If you'd rather skip that entirely and get accurate alignment the moment you unbox your machine, a factory-installed, pre-calibrated camera system is worth paying for.

OMTech Laser Engravers: With or Without a Built-In Camera?
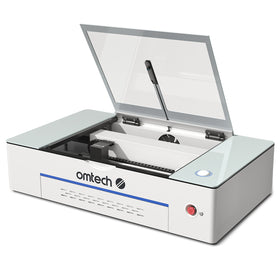
If you're specifically comparing OMTech laser engraving machines, models with a factory-installed camera, such as the OMTech Polar Lite CO2 Laser Engraver or other models featuring an integrated wide-angle lid, are generally the smarter buy. It's technically possible to retrofit an older cabinet laser with an aftermarket camera, but doing so introduces several headaches that a pre-equipped model simply avoids.
- OMTech’s factory-installed cameras are bolted to a fixed position with known geometric coordinates, so the software can calculate visual scale accurately without you having to re-measure your mounting height every time you adjust focus.
- A factory-calibrated OMTech system is ready to use LightBurn's panoramic preview features with minimal setup right out of the box.
- OMTech's camera-equipped machines position their interior LED strips specifically to illuminate the workspace evenly, without throwing glare or shadows into the lens, keeping your drag-and-drop alignment clean and reliable.
- While a DIY camera install is possible, it's rarely worth the interference issues, calibration time, and mounting headaches when a factory-equipped model handles all of it for you from day one.
A Guide to OMTech Laser Engravers With Built-in Cameras: Desktop vs Freestanding Models
Choosing between a desktop model and a freestanding cabinet laser comes down to how the camera handles changing material heights and your available physical workspace.

1. Desktop Model (OMTech Polar Desktop Laser Engravers)
In the OMTech Polar desktop laser engravers, the camera is mounted directly into the center of the lid at a fixed, short distance from the bed. Because the distance between the camera and the bottom of the laser is always the same, the visual scale never changes. Calibration is a "set it and forget it" process.
Desktop models have limited vertical space (Z-depth). You can only fit flat or relatively thin materials (usually under 2 inches thick) under the lens. If your work is mostly flat sheet goods, acrylic panels, thin wood, standard blanks, this is a straightforward, low-maintenance setup.
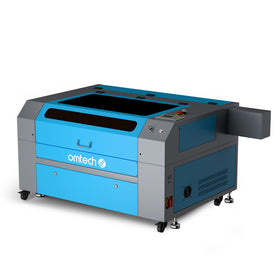
2. Freestanding Cabinet Lasers (60W to 100W+ Machines)
In OMTech's freestanding laser engraver models like the Pronto Series CO2 laser engravers and the Marker Series CO2 laser engravers, the camera is mounted much higher up on the large, heavy hood of the machine to capture the massive workspace.
Cabinet lasers have a motorized Z-axis bed that moves up and down to accommodate thick items or rotary attachments. When you lower the bed, the material moves further away from the camera, which can throw off the visual alignment scale in LightBurn unless you always align your material at the same focus height.
You get a massive workspace and the power to cut through thick materials or engrave giant objects (like large crates, thick cutting boards, or baseball bats) that would never fit in a desktop machine.
OMTech Laser Engravers With Cameras: Summary Comparison
| Feature | Desktop Model | Freestanding Cabinet |
| Camera Setup | Factory calibrated, highly accurate | Requires minor scaling adjustments if bed height moves |
| Workspace Size | Compact (approx. 12" x 20") | Large (up to 24" x 40" or bigger) |
| Material Thickness | Best for flat, thin sheets | Excellent for thick objects and rotaries |
| Mobility and Power | Plugs into standard wall, sits on a desk | Requires a dedicated workshop space and heavy ventilation |
If your projects are mostly flat, thin, and consistent, a desktop model gives you accurate, hassle-free alignment with minimal footprint. If you regularly work with thick materials, rotary attachments, or oversized objects, a cabinet laser's larger workspace is worth the small extra step of keeping your focus height consistent for reliable alignment.

Final Thoughts on Inbuilt Cameras for Laser Engravers
A camera is easy to overlook when you're comparing laser engravers on wattage and price alone, but it quietly shapes almost every part of your day-to-day experience with the machine: how quickly you can set up a job, how much material you waste, how safely you can monitor a long cut, and how easily you can work with anything that isn't a perfectly uniform sheet.
The right choice ultimately depends on your specific workflow. If you run LightBurn or a closed proprietary app, work with irregular or expensive materials, or handle a lot of varied, one-off projects, a built-in camera will save you real time and money. If you're mostly cutting uniform sheets in bulk with LaserGRBL, the camera matters far less, and your money might be better spent elsewhere.
Whether you land on a compact desktop model or a larger freestanding cabinet laser, understanding how the camera fits into your specific software, materials, and workflow is the difference between a machine that sits underused and one that becomes the centerpiece of your workshop.
You may also be interested in 4 things to look for in a laser engraver for first-time buyers