The Best Approach To Teaching Engineering Design With Laser Cutter in the UK
A laser cutting machine is arguably the best equipment you can use in a school to teach the Engineering Design Process (EDP). The main advantages a laser cutter gives you in the classroom are speed and flexibility: its rapid cutting speed allows students to fail, redesign, and re-fabricate a physical prototype within a single class period.
However, when it comes to teaching engineering design in a classroom with the aid of a laser cutter, it is very important to have a goal in mind and employ the right strategies to achieve that goal. For one thing, not all laser cutter projects are designed to teach engineering to students.
So, what must your goal be, what is the best way to approach it, and what are some practical projects you can try? Lets explore

3 Core Engineering Concepts to Teach With a Laser Cutter in a Classroom
Your ultimate goal, when teaching the engineering design process with a laser cutter in a classroom, should be to guide your students to advance from craft projects (flat keychains, engraved coasters, etc.) to parametric design, functional joinery, and iterative testing.
That is the key difference between having a laser engraver for education in general and using a laser engraver specifically for engineering design. Here are three core engineering processes to begin with:
-
Help students understand the "Kerf" (Tolerances): The nature of the laser beam in a laser cutter allows you to teach tolerance in engineering design to students. During laser cutting, the laser beam vaporizes the material (the kerf). Here’s how it helps in engineering design: students must measure this beam width and adjust their CAD slots so interlocking parts fit perfectly, either a loose slip-fit or a snug press-fit.
-
Challenge them to work with or around material constraints: Using a laser cutter allows you to teach students to design within limitations (e.g., sheet size, material thickness, and tensile strength).
-
Teach the power of iteration in engineering: Because cutting cardboard or thin wood takes only minutes, students can run a test print, identify a flaw, modify their vector file, and recut immediately.
How to Map the Engineering Design Process to the Laser Bed.
A laser cutter perfectly visualizes abstract engineering concepts if you structure your grading rubrics around the fabrication process:
| EDP Step | Classroom Application with Laser | Engineering Standard Addressed |
| Research and Constraints | Measuring material thickness with calipers. Students learn that a "1/8 inch" piece of plywood actually varies wildly in millimeters. | Measurement and Precision |
| Prototyping | Utilizing cardboard or heavy cardstock to test vector paths and slot fits in 60 seconds before cutting expensive wood. | Rapid Prototyping and Cost Efficiency |
| Testing and Failure | Putting the assembled mechanism under stress. Do the teeth on the gears shear off? Does the joint wiggle? | Evaluating a Solution |
| Iteration | Going back into LightBurn or CAD software to adjust slot tolerances by 0.1mm and re-cutting. | Design Optimization |

4 High-Impact Engineering Projects To Teach Engineering Design to Students With a Laser Cutter
1. The Press-Fit "Flat Pack" Challenge
In this project, the goal is to design a smartphone stand, desk organizer, or small stool that can hold a specific weight without using glue, screws, or tape.
The engineering challenge here is creating interlocking tabs, slots, and finger joints. Students learn that a slot exactly equal to the wood's thickness will be too loose due to the laser's kerf. They must iterate their designs by hundredths of an inch to find the perfect interference fit.
Resource Tip: You can use the free online CNC Panel Joinery Notebook to teach students different mechanical wood-joining techniques.
2. Structural Truss and Bridge Testing
The goal in this project is for the students in groups to design a bridge or crane arm using a fixed amount of material, then load-test it to destruction.
The engineering challenge: Statics, tension vs. compression, and strength-to-weight ratios. The students must engrave their team names and alignment markers, cut the trusses, assemble the bridge, and calculate the efficiency score (Mass Held ÷ Mass of Bridge).
3. Mechanical Automata and Gear Trains
The goal of this project is to build a hand-cranked mechanical toy (automata) or a gear-reduction system that moves a figure or lifts a weight.
The engineering focus here is on kinematics, gear ratios, rotational-to-linear motion, and axle clearances. This teaches students how to handle moving parts and friction.
4. Modular Marble Runs
The goal in this project is to have each student team design one "track zone" on a vertical grid. When all teams clip their panels together, a marble must travel seamlessly from the top left corner of the room to the bottom right.
The engineering challenge is working with systems engineering, interface constraints, and teamwork.
If Team A’s exit track doesn't perfectly align with Team B’s intake track, the system fails. When students work in teams, these structural and mechanical projects naturally enforce division of labor, system integration, and technical communication.

What Kind of Laser Cutting Machine Do You Need to Teach the Engineering Process in a Classroom?
To teach the engineering design process (problem definition, rapid prototyping, testing, and iteration) in a classroom setting, you need an enclosed CO2 laser cutter. Enclosed CO2 laser engravers may be slightly more costly upfront compared to diode laser cutters, but they are also:
-
Much safer. Most enclosed desktop CO2 laser cutting machines offer Class 1 safety with automatic lid detection sensors, so students cannot accidentally expose their eyes to the beam.
-
They offer you more versatility: they cut clear/colored acrylic and thicker hardwoods cleanly and much faster than diode lasers.
OMTech Laser Cutters For Teaching the EDP in the Classroom
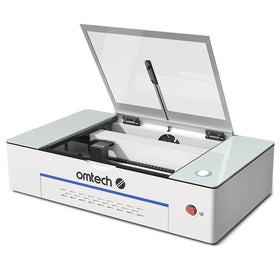
1. The OMTech Polar Lite: Small and Compact For Classroom Use
The OMTech Polar Lite CO2 Laser Cutter suits teaching the Engineering Design Process because it lets students move through every stage on one machine, quickly and cheaply.
- It is safe. This is an FDA Class 1 certified laser engraver, which means it meets the highest safety standards for reliability and long-term use.
- Fast iteration: Students can design, cut, test, and revise a prototype within a single class period, which makes the “improve” stage practical.
- Low-cost materials: It cuts and engraves wood up to 0.61", acrylic up to 1", leather, fabric, cardboard, and coated metal. Cheap cardboard and thin plywood prototypes let students fail and recut without a big budget.
- Classroom-friendly footprint: It’s a compact 20"x12" desktop unit with built-in exhaust fans and a 0.5 gal water tank, so setup is simpler, and there’s less to assemble.
- Accessible price: At $1,799.99 (at the time of writing), it is more affordable than the Polar+ and many competing machines.
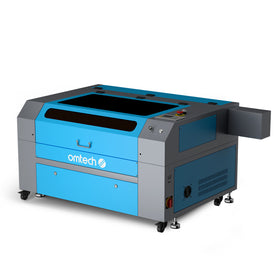
2. The OMTech AFAF2028-60 laser engraver: For Bigger Classrooms and School Makerspaces
The OMTech Turbo-756 laser engraver is a bigger laser engraver with more space and capacity for teaching the Engineering Design Process, especially in a dedicated makerspace or fab lab.
- Large work area for bigger projects: It has a 700 x 500 mm processing area, so students can build larger prototypes, such as enclosures or furniture models, or nest several students' parts on one sheet.
- LightBurn compatibility. Less manual calibration means more time on designing and testing, and fewer failed cuts.
- Software compatibility: It supports common graphics formats such as DXF, AI, and JPG, so students can bring in designs from the CAD and vector tools they already use.
- Real-world fabrication: It reads as a professional tool, which suits EDP projects aimed at authentic, client-style problems.
Pro Buying Tip:
For a typical classroom, the Polar Lite is the better fit in terms of size, setup, and cost. The Pronto -756 makes sense if you have a dedicated space and want students to build larger projects. Both models are currently listed in OMTech's Black Friday 2026 offer, which will run until the 27th of November.
 What Are The Most Budget-Friendly Laser Cutting Materials for High-Volume Classrooms?
For many schools, one of the main barriers to teaching engineering design with a laser cutter is the high cost involved. However, one of the areas you can easily save costs on is engineering materials. Here are some of the most affordable laser engraving materials to use when teaching engineering design in a large classroom with a laser cutter:
- Corrugated Cardboard: Do not underestimate it. Set your laser settings to cut cardboard fast. It is completely free if you source shipping boxes, and it allows students to build massive, scale-model spatial enclosures or mechanical linkages without burning through your budget.
- MDF (Medium-Density Fiberboard): Significantly cheaper than plywood and perfectly uniform. Because it has no grain structure, it cuts incredibly predictably, making it the superior material for testing exact gear fitments and slot tolerances.
- Chipboard / Kraft Board: Ideal for smaller scale-modeling, custom packaging designs, or light mechanism links.
What is the Best Laser Engraving Software For Teaching Engineering Design To Students?
Engineering students shouldn't just draw shapes in graphic design programs; they should learn parametric modeling. For this, you need to start them with basic beginner laser engraving software, but then advance them slowly toward more sophisticated software. Consider the following path:
- Beginner: Learn basic vector paths, layers, and rasterizing directly inside LightBurn or Inkscape.
- Intermediate: Design 3D interlocking boxes using automated generator tools like Boxes.py to understand how finger joints and T-slots work.
- Advanced (True Engineering): Model the entire assembly in a 3D CAD workspace like Autodesk Fusion 360 or Onshape. Export the flat faces as DXF/SVG files. This teaches students how to design a complex 3D object and translate it down into 2D manufacturing operations.

Essential Technical Resources For Teaching Engineering Design With a Laser Cutting Machine
Instead of textbooks, direct your students to industry-standard digital notebooks for engineering layout ideas. A classic community recommendation for mastering 2D assembly is the CNC Panel Joinery Notebook on Make: Zine.
It provides brilliant visual breakdowns of how to create strong, structural intersections using flat materials, which students can directly copy into their own CAD designs.
Final Thoughts on Teaching Engineering in the Classroom With a Laser Cutter
Teaching engineering design is about more than helping students understand technical concepts. It is about giving them opportunities to apply those concepts, build functional prototypes, test their ideas, identify weaknesses, and improve their designs.
A laser cutter makes this process faster, more engaging, and easier to integrate into classroom activities. The key is to move beyond simple engraving projects and introduce challenges that encourage problem-solving, precision, teamwork, and iterative thinking.
Ultimately, the best educational laser cutter is one that allows students to experiment safely, learn from mistakes, and turn their ideas into functional designs. Explore OMTech's range of CO2 laser engravers and cutters to find a machine that supports your school's engineering and STEM education goals.
You may also be interested in 10 practical laser cutter classroom projects you can introduce to your students as a teacher.