What Are The Best Laser Engraver for Challenge Coins? Fiber Galvo vs. MOPA Guide
The main advantage of using a laser engraving machine for customizing challenge coins is that they are optimized to easily and effectively make highly detailed, fully customized 3D depth-mapping on small batches while avoiding the massive setup or structural delays that are associated with traditional factory minting.
However, to be successful in challenge coin engraving, you need to understand which laser engravers work best, why the quality of your blank coins matters (not all are good), what prep work is needed, and which post-processing methods you may need to apply to get that perfect finish.
You can think of these as the basics of challenge coin laser engraving, and that is what we will cover in this blog.

Laser Engravers For Challenge Coins Explained: Which Do You Need?
The laser engraving machine is the most important and central piece of equipment in challenge coin laser engraving, and this is important because not all types of laser engraving machines can work.
For challenge coin engraving, you need a mid-to-high power fiber Galvo laser (a laser that steers the beam with fast-moving mirrors rather than a moving print head, ideally 30W to 60W or higher) to achieve permanent, high-quality results.
The main reason you need a galvo fiber laser for challenge coins is that standard consumer lasers lack the wavelength power and speed required to physically engrave raw metals like brass, copper, or stainless steel. Also, galvo fiber lasers are more mobile and overall better for deep engraving, which is what you need when engraving challenge coins.
Here are three critical reasons why a galvo laser is the industry standard for this specific project:
Challenge Coin Laser Engraving: Why You Need a Galvo Fiber Laser
1. Its Wavelength is Compatible With Metal
- Standard hobbyist machines (CO2 and diode lasers) use wavelengths that pass right through or bounce off bare metals, and a diode laser can (at best) only mark metal.
- A Fiber laser utilizes a 1064nm wavelength that bare metals actually absorb, allowing the beam to vaporize and deeply ablate the material.
2. They are Quicker and More Effective For Coin Engraving
Traditional gantry lasers move the entire laser head back and forth along heavy X and Y axes tracks, which is generally not quick or mobile enough for challenge coin engraving. Attempting deep 3D coin engraving on a slower gantry-style setup can take an agonizing 1.5 hours per side.
Galvo lasers are preferable because they have a galvanometer system that uses two ultra-fast, motorized mirrors to steer the laser beam from a fixed overhead position. Because it moves mirrors instead of a heavy gantry, it can reach speeds of thousands of millimeters per second. This shrinks coin engraving times down to just a few minutes or seconds.
3. They Are Better Equipped For Achieving Deep 3D Reliefs
True challenge coins require a 3D textured relief with distinct depth and crisp logos. This is very important because, to get depth, a laser must pass over the same design hundreds of times, peeling away microns of metal with each layer.
A high-powered Galvo laser (typically 30W to 60W or higher) can run these hundreds of necessary passes incredibly quickly without wearing out mechanical tracks.

What Are The Best Laser Engravers for Challenge Coin Engraving?
1. 30W Fiber Galvo Lasers: Best For Beginners and Hobbyists
A 30W fiber laser is the bare minimum for metal engraving. Choose a 30W fiber laser engraver if you are just new to challenge coin engraving, doing it just as a hobby, or on a limited budget. For context, deep metal removal is slow. A 20W fiber laser can take up to 4 hours per side on steel, while a 60W MOPA laser cuts that down to roughly 1.5 to 2.5 hours per side.
Recommended Galvo Lasers For Challenge Coin Engraving:
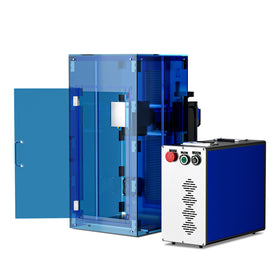
- OMTech Galvo F-30: The Galvo-tech drive and scanning system of this machine provides both outstanding accuracy and fast, stable marking on metal, including coins. It is a single-housing 30W Galvo unit that's a straightforward, budget-friendly entry point for hobbyists just starting with challenge coin engraving.
2. 50W or 60W MOPA fiber lasers: Best For Commercial Challenge Coin Engraving
If you want to engrave challenge coins faster and/or unlock color engraving for your challenge coins, you can upgrade to a 50W or 60W MOPA (Master Oscillator Power Amplifier) fiber laser. It will dramatically speed up the process and unlock color marking capabilities on certain metals.
Recommended 50W/ 60W MOPA Fiber Lasers For Commercial Challenge Coin Engraving
- OMTech M-60 MOPA JPT Laser Engraver (60W): A 60W MOPA machine with a Galvo-Tech drive and scanning system, built for faster processing times (up to 700mm/s) and color-marking capability. Ideal for engraving words, logos, barcodes, etc on different kinds of metal.
- OMTech M60C MOPA Fiber Laser Engraving Machine. With faster engraving speeds (up to 10,000 mm/s), this is an ideal laser engraver for batch challenge coin engraving. Its smaller footprint makes it an ideal alternative to the 60W MOPA fiber if bench space is limited.
Can You Engrave Challenge Coins With Diode and CO2 Lasers?
Here is an important distinction to make when choosing a laser engraver for challenge coin engraving: you cannot properly deep-engrave or emboss metal challenge coins using standard diode or CO2 lasers. These laser engravers, though they may work (with certain adaptations and tricks), are not recommended.
- Diode lasers cannot engrave metal. They operate on a wavelength (380–455nm) that mostly reflects off shiny metals.
- CO2 Lasers are ineffective for brass or copper. You can use a marking spray like CerMark to get around this limitation, but the result sits on top of the metal and is not permanent.
Some lower-end lasers can mark metals if you use special spray to coat them, but it is not advisable to use these on challenge coins: the markings are going to be superficial and eventually rub off. They never survive in the long term.

How to Source The Best Challenge Coin Blanks For Laser Engraving
One very common problem many people face when engraving challenge coins is that they buy cheap blanks that turn out to be plated junk metal. To avoid this trap, you can either use the magnet test method or buy from trusted suppliers:
-
Use the magnet test: Always test your blanks with a magnet. Genuine solid brass is non-magnetic. If the coin sticks, it is plated steel or iron, which will burn patchily and ruin your design.
-
Buy from trusted suppliers: For reliable, solid 40mm brass blanks, check out specialty stores like Swissbuy, Umburry, or Lone Star Signs. Avoid those generic Amazon storefronts.
Laser Engraving Challenge Coins: Software and Design Workflow
The primary goal when laser engraving challenge coins is to achieve a professional, high-contrast 3D relief effect or deep, crisp marking that honors the tradition and meaning of the coin. To achieve this aim, your digital preparation needs to be very precise:
- Start with the artwork: Use vector design software (like Adobe Illustrator or Inkscape) or specialized 3D depth-mapping tools like Depth-R to generate clean gradients for your 3D image modes.
- Use AI tooling: Many people nowadays use AI image generators to blend artistic concepts, but take note that you will need to clean up and "bridge" the vectors manually using software to make them laser-ready.

What Are The Baseline Settings For Challenge Coin Engraving?
1. Deep 3D Relief Engraving Settings
To achieve the classic, tactile depth of a traditional challenge coin, your software design must use a 3D grayscale height map, and your image mode must be set to 3D Slice (typically using 200 to 256 layers to map out the gradients).
| Setting | Standard 50W / 60W Fiber Laser | 20W / 30W Fiber Laser |
| Speed | 2,000–2,500 mm/s | 1,000–1,500 mm/s |
| Power | 85%–95% | 90%–100% |
| Frequency | 45–100 kHz | 30–50 kHz |
| Pulse Width | 100–200 ns (for MOPA lasers) | — |
| Line Interval / Density | 0.025 mm (approx. 300–400 lines/cm) | 0.025 mm |
| Scan Angle | 0° or 45° | — |
| Scanning Mode (if available) | Bidirectional scanning enabled | — |
2. Cleanup Pass Settings (Crucial for Contrast)
Deep engraving burns away metal but leaves a thick layer of soot, slag, and discoloration behind. To reveal the shiny metal underneath, you must alternatively program or manually run a cleanup pass every 10 to 20 engraving layers.
- Speed: 3000 to 3150 mm/s (Very fast to avoid deep burning)
- Power: 20% to 30%
- Frequency: 80 to 120 kHz
- Pulse Width: 30 to 60 ns
- Scan Angle: Altered angle (e.g., 22 or 90 degrees) to clean up crosshatch lines.
Post-Processing: To make the text pop, use a chemical like Brass Black to darken the recessed engraved areas, then gently buff the raised surfaces with steel wool.
Laser Engraving Challenge Coins: Key Tips For Success
- Processing time is usually longer: Deep metal removal is slow. A 20W fiber laser can take up to 4 hours per side on steel, while a 60W MOPA laser cuts that down to roughly 1.5 to 2.5 hours per side.
- Design and depth maps are paramount: You cannot just use a flat vector file for relief. You need specialized depth map software (like Depth-R) and LightBurn to handle 3D slice settings and multi-layer passes.
- The quality of your blanks matters: Cheap coin blanks from generic online marketplaces are usually plated steel rather than solid brass. They burn patchily, smell terrible, and fail to give a clean, embossed 3D look. Real brass or solid metal blanks must be sourced from reputable suppliers.
- Commercial viability can be a challenge: The problem many markers have with challenge coin laser engraving is that it takes too much machine babysitting time to be profitable at a low price point, making them best suited for personal hobbies, small unit runs, or unique custom gifts.

Final Thoughts on Laser Engravers For Challenge Coins
Challenge coin engraving comes down to matching the right laser to the job: a mid-power fiber Galvo machine is non-negotiable for permanent, professional-looking metal work, while diode and CO2 lasers simply aren't built for it. Beginners and hobbyists can get solid results from a 30W fiber unit, while anyone taking on higher volume or color-marked coins will want to step up to a 50W or 60W MOPA machine.
Beyond the machine itself, sourcing genuine solid brass blanks and dialing in your 3D relief and cleanup pass settings are what separate a crisp, high-contrast coin from a patchy, amateur-looking one. You can browse OMTech's full range of MOPA and fiber laser machines to compare the Galvo and MOPA options mentioned above.