How to Teach Physics With a Laser Cutter
When it comes to teaching physics, a laser cutting machine is fantastic because it allows students to turn abstract mathematical formulas and mechanical concepts into tangible projects. From building custom gear trains and pendulum assemblies to creating optical experiment fixtures and structural models, there are many ways to make physics more interactive.
Physics is one of the most interesting subjects to teach with a laser cutting machine. Ever since the OMTech Education Program was launched, educators and makers have found new and exciting ways to use laser cutters as a tool to introduce more hands-on physics lessons and practices into their classrooms.
Here are 5 ways educators and makers can use laser cutters to teach physics.

5 Ways to Use a Laser Cutter When Teaching Physics
1. Optics, Interference, and Diffraction Experiments
Optics is the branch of physics that is concerned with light and how it behaves when it interacts with different materials. With a laser cutter, students can easily explore and learn concepts like reflection, refraction, diffraction, and interference.
These concepts can be difficult to understand through diagrams alone, but with a laser cutter you can help build the equipment needed to demonstrate them.
Example Projects
- First, have students laser-cut mounts, slit holders, and optical benches to create simple experiments with laser diodes. By directing light through single or double slits, they can observe diffraction and interference patterns and investigate how light behaves as a wave.
- One other interesting experiment is one that involved measuring the thickness of a human hair. Students placed a strand of hair in the path of a low-power laser and observed the diffraction pattern projected onto a surface. By measuring the spacing between the resulting fringes and applying the relevant mathematical equations, students could calculate the approximate thickness of the hair.
Laser-cut components can also help students build optical setups for studying reflection, light paths, and interference. For more advanced experiments, educators can fabricate adjustable mounts for mirrors, beam splitters, and other optical components.
These activities help students understand that light does not simply travel in straight lines under every condition. They can observe how light interacts with obstacles and materials, then use their measurements to explain the results.
2. Mechanical Systems and Classical Mechanics
Classical mechanics is another area where laser cutters can be particularly useful because it deals with forces, motion, energy, and the behavior of physical objects. Instead of relying entirely on classroom demonstrations, students design and fabricate their own mechanical components using wood, acrylic, and other suitable materials.
Example Projects
- In one example, educators have students build pendulums, ramps, trebuchets, and gear assemblies. These projects provide opportunities to investigate concepts such as gravity, torque, friction, mechanical advantage, and the conservation of energy.
- Another particularly interesting activity is building a small trebuchet. Students design and cut the different structural components, assemble the mechanism, and investigate how changing the counterweight or release angle affects the projectile's motion.
- A third application is constructing a small bridge using laser-cut wooden components. Students experiment with different structural designs, test how much weight each bridge can support, and investigate how forces are distributed across different sections of the structure.
The advantage of using a laser cutter for these projects is that students can quickly modify their designs and test different configurations. If a component does not fit correctly or a structure fails under a certain load, they can make adjustments and try again.
3. Visualizing Abstract Mathematics and Physics Equations
Some physics concepts are difficult to visualize because they involve mathematical relationships that cannot easily be represented using ordinary classroom objects. Laser cutters and 3D printers can help educators overcome this challenge by producing physical models of complex mathematical concepts.
Example Projects
- For example, students can use layered acrylic or wood to create three-dimensional representations of mathematical surfaces, vector fields, and wave patterns. Instead of looking at a flat diagram, they can examine the shape from different angles and understand how different variables affect its structure.
- Another interesting application is visualizing heat equations. Students can take a mathematical model representing how temperature changes across a surface and convert it into a series of layered contours. When assembled, these layers create a physical representation of temperature distribution.
- Laser-cut models can also help students understand calculus concepts such as curves, gradients, and changing surface areas.
These activities are particularly useful for older students who are learning more advanced mathematics and physics. They help bridge the gap between equations and their real-world applications.
4. Custom Sensor and Instrument Enclosures
Physics experiments often require more than just a few basic materials. Students may need sensors, microcontrollers, motion detectors, and other electronic components to collect measurements and monitor physical changes. A laser cutter makes it easier to fabricate custom enclosures and mounting systems for these devices.
Example Projects
- For example, students can design acrylic or plywood housings for motion trackers, light gates, and other data-logging equipment. These enclosures keep the electronic components organized while providing access to the necessary switches, sensors, and wiring.
- This is particularly useful when building experiments involving motion and acceleration. Students can create a small vehicle fitted with sensors, then use a custom laser-cut housing to secure the electronics while collecting data about its movement.
- Similarly, students can design mounting brackets for light sensors and other instruments used in optics experiments.
Beyond making the equipment easier to assemble, these projects introduce students to the practical side of engineering. They learn how to measure components, design suitable housings, and account for the physical dimensions of the equipment they are using.
5. Learning Industrial Design Software and Manufacturing Skills
Using a laser cutter to teach physics also introduces students to digital design and manufacturing processes.
Before cutting a project, students must create or prepare a digital design using vector design software. Programs such as LightBurn allow them to draw shapes, adjust dimensions, arrange components, and prepare files for cutting and engraving. This process introduces several useful technical concepts.
- For example, students learn about scaling, measurements, vector geometry, and material thickness. They also encounter kerf, which refers to the material removed by the laser during cutting.
- Understanding kerf is particularly important when designing components that need to fit together. If students are building a gear assembly or a tab-and-slot structure, they must account for the small amount of material removed during the cutting process to ensure that the finished parts fit correctly.
- Students can also learn about machine calibration, cutting settings, and the relationship between laser power, speed, and material thickness.
- These skills are useful beyond physics classes. They introduce students to digital fabrication techniques used in engineering, product design, architecture, and manufacturing.
Ultimately, the biggest advantage of using a laser cutter in physics education is that it allows students to turn theoretical knowledge into something they can build, measure, and test.

Should You Use a Laser Cutter for Optics, Mechanics, or Thermodynamics?
When choosing laser-cut physics projects, it is important to consider the particular branch of physics you want students to explore. This is because optics, mechanics, and thermodynamics all involve different physical properties. A material that works well for studying light may not be suitable for testing structural strength or heat transfer.
Understanding these differences helps educators select the right materials and design more effective classroom projects.
Why Each Physics Domain Requires a Different Approach
- Optics (Light and Waves): Optics experiments focus on how light travels through or interacts with different materials. Transparent materials such as clear cast acrylic are useful for certain demonstrations involving light paths and refraction. Smooth surfaces, consistent material thickness, and accurate measurements are important when fabricating optical experiment components.
- Mechanics (Forces and Motion): Mechanical projects involve physical stress, friction, and energy transfer. Rigid materials such as Baltic birch plywood are useful for structural components, while suitable low-friction plastics can be used for moving parts and gears. Students must also account for kerf when designing interlocking joints and rotating assemblies.
- Thermodynamics (Heat and Energy): Thermodynamics experiments investigate how thermal energy moves, is stored, and is transferred between objects. Students can use laser-cut components to build insulated chambers, airflow baffles, and models representing temperature distribution. Material selection should consider properties such as thermal conductivity, heat capacity, and surface characteristics.
Laser Cutter for Optics vs. Mechanics vs. Thermodynamics
| Physics Branch | Core Material Properties | Design Focus | Key Classroom Projects |
| Optics | Optical clarity, smooth surfaces, and uniform thickness | Precision geometry, light paths, and alignment | Optical benches, slit diffraction plates, and prism holders |
| Mechanics | Structural strength, low friction, and dimensional stability | Kerf compensation, moving joints, torque, and load distribution | Gear trains, truss bridges, trebuchets, and coupled pendulums |
| Thermodynamics | Thermal conductivity, heat capacity, and surface properties | Surface area, insulation, and heat dissipation | Heat sink models, insulated calorimeters, and layered heat-equation models |
Optics vs. Mechanics vs. Thermodynamics Laser Cutter Physics Projects
Because each branch of physics relies on different material properties, it helps to choose laser-cut projects that demonstrate the most important principles in each area. Here are some examples educators can introduce into their classrooms.
Optics Physics Laser Cut Projects (Light, Waves, and Refraction)
1. Custom Acrylic Prisms
Cut triangular shapes from clear cast acrylic to create simple prism models. Students can use these components to investigate how light changes direction when it passes between materials with different refractive indices. They can also compare how light behaves when entering a material at different angles.
2. Adjustable Diffraction Slit Plates
Create holders for single- and double-slit experiments using laser-cut acrylic or other suitable materials. Students can mount precision slits and direct a low-power laser through them to observe diffraction and interference patterns.
By measuring the distance between interference fringes, they can investigate the relationship between wavelength, slit separation, and the distance to the projection surface.
3. Precision Optical Bench
Cut a long strip of plywood or acrylic and engrave a measurement scale along its surface. Add adjustable slots for holding mirrors, lenses, and light sources. This creates a simple optical bench where students can position different components, align light paths, and investigate reflection and refraction.
4. Laser Maze and Reflection Puzzles
Build a simple laser maze using laser-cut angled mirror stands and target blocks. Students must calculate the angles of incidence and reflection to direct a low-power laser around obstacles and toward a target. This is an engaging way to introduce the laws of reflection and encourage students to apply geometry to practical problems.
4 Mechanics Physics Laser Cut Projects (Forces, Motion, and Energy)
1. Gravity-Held Arch Bridges
Cut individual wooden or cardboard segments that students can assemble into a freestanding arch bridge. The structure relies on compression and friction rather than glue or fasteners. Students can investigate how the shape of the arch affects structural stability and how weight is distributed across different sections.
2. Rubber-Band and Balloon-Powered Cars
Have students design lightweight plywood chassis and attach wheels to create small moving vehicles. They can experiment with different wheel diameters, chassis weights, and axle positions to investigate rolling friction, rotational inertia, and momentum. For rubber-band-powered cars, students can also examine how stored elastic potential energy is converted into kinetic energy.
3. Planetary Gear Trains
Cut interlocking spur gears and ring gears from suitable materials such as plywood or low-friction plastics. Once assembled, students can investigate gear ratios, mechanical advantage, and angular velocity by changing the size and arrangement of the gears.
4. Coupled Pendulum Frames
Build a rigid A-frame stand with mounting points for two pendulums. Add engraved angle markings to help students measure their movement. When the pendulums are connected through a shared support, students can observe energy transfer and investigate resonance by changing their length and mass.

Laser-Cut Thermodynamics Physics Projects (Heat, Insulation, and Energy Transfer)
1. Custom Heat Sink Models
Create different fin-shaped models to investigate how surface area affects heat dissipation. Students can compare different fin arrangements and measure how quickly a controlled heat source cools under consistent experimental conditions.
Laser-cut parts can be used to create the supporting structures and airflow guides, while suitable heat-conducting materials are needed for the actual heat sink components.
2. Insulated Calorimeter Box
Cut interlocking layers of wood, cork, or felt to create an insulated chamber. Students can compare how different wall materials and thicknesses affect heat loss from a warm water container. By recording temperature changes over time, they can investigate thermal insulation and energy transfer.
3. 3D Heat-Equation Topography
Convert a mathematical surface representing heat distribution into a series of contour layers. By cutting these layers from thin wood or acrylic and stacking them together, students can create a three-dimensional representation of temperature gradients. This provides a useful visual introduction to how temperature varies across a surface.
4. Solar Oven Concentrator Frame
Cut parabolic support ribs from suitable plywood or cardboard and assemble them into a frame lined with reflective material. Students can use the structure to investigate how the shape and positioning of reflective surfaces affect the concentration of sunlight and the resulting temperature.
What Are the Best Laser-Cut Physics Projects for Elementary, Middle, and High School Students?
The best way to introduce laser-cut physics projects in schools is to match the complexity of each activity to the students' age and learning level.
Younger students generally benefit from simple assembly projects and demonstrations involving basic forces, balance, and motion. Older students can take on more challenging activities involving mechanical systems, optical experiments, and mathematical models. Here are some projects worth considering for different educational levels.
Elementary and Middle School (Focus: Forces, Balance, and Geometry)
- Gravity-held arches: Cut interlocking wooden or cardboard blocks that students can assemble into a freestanding bridge arch. This teaches basic concepts such as compression, balance, and structural stability.
- DIY Lazy Susans and Gyroscope Bases: Assemble simple rotating wooden platforms to help younger students understand rotational motion and inertia.
- Tab-and-Slot 3D vehicle puzzles: Cut snap-together vehicle components that students can assemble without glue or complicated fasteners. They can experiment with weight distribution, wheel placement, and basic friction.
These projects work well because younger students benefit from hands-on assembly and simple mechanical demonstrations. They can learn by building, observing, and experimenting without needing advanced CAD skills or complicated mathematical calculations.
High School (Focus: Kinematics, Torque, and Wave Interference)
- Wind-Up Rubber-Band Racers: Students can design plywood chassis and simple gearboxes to convert stored elastic potential energy into kinetic motion. They can experiment with different designs to investigate speed, friction, and energy transfer.
- Cam and Linkage Mechanisms: Designing and cutting rotating wooden cams and levers introduces students to mechanical advantage, torque, and the conversion of rotational motion into linear movement.
- Single- and Double-Slit Diffraction Frames: Students can cut precision holders for optical experiments and use them to investigate wave interference. By measuring the resulting patterns, they can calculate wavelengths and explore the behavior of light.
High school physics projects can place more emphasis on student-led design and experimentation. Students can use CAD software to create their own components, test different configurations, and collect measurements to support their findings.
College and University (Focus: Precision Optics and Custom Lab Hardware)
- Hair-Width Diffraction and Measurement Jigs: Students can build stable holders for microscope slides or strands of hair and use them in diffraction experiments to estimate microscopic dimensions.
- Custom Optical Bench and Interferometer Mounts: University students can fabricate precision slotted rails, mirror mounts, and beam-splitter stands for tabletop optical experiments.
- 3D Mathematical and Thermodynamic Models: Advanced students can convert mathematical functions and heat-dissipation equations into layered acrylic or wood models. These can help them investigate gradients, boundary conditions, and three-dimensional relationships.
At the college and university level, laser cutters are particularly useful for fabricating custom experimental equipment. Students can design and produce components that fit the specific requirements of their experiments rather than relying entirely on commercially available laboratory equipment.

What Laser Cutter Do You Need to Teach Physics in the Classroom?
When choosing a laser cutter for a physics classroom, it is important to consider the types of projects students will be working on, the materials they need, and how frequently the machine will be used.
For many school makerspaces and STEM laboratories, an enclosed CO2 laser cutter is a versatile option. These machines process materials such as wood, plywood, cardboard, and acrylic, making them suitable for a wide range of mechanical, structural, and educational projects.
A CO2 laser is particularly useful when working with clear acrylic. Unlike many common diode lasers, CO2 lasers can cut clear acrylic effectively, making them a practical choice for educators who want to introduce projects involving transparent materials.
Why Choose a CO2 Laser Over a Diode Laser for Teaching Physics?
There are several reasons why a CO2 laser cutter may be a better choice for a school that plans to introduce different types of physics projects.
1. Cutting Clear Acrylic
One of the biggest advantages of a CO2 laser is its ability to cut clear acrylic. This is important for certain optics demonstrations, custom experiment fixtures, and transparent mechanical models. Many common blue diode lasers struggle to cut clear acrylic because the material transmits much of their light rather than absorbing it effectively.
2. Faster Classroom Production
CO2 laser cutters generally offer higher cutting capabilities than entry-level diode machines. This would be useful in classrooms where educators need to prepare multiple sets of components for different groups of students.
Rather than spending too much time fabricating individual parts, teachers can prepare several components in advance and allow students to focus on assembling, testing, and studying their projects.
3. Versatile Material Compatibility
A CO2 laser cutter can work with several materials commonly used in educational projects, including plywood, balsa wood, cardboard, and acrylic. This versatility allows educators to introduce different types of experiments without needing separate fabrication equipment for every project.
4. Greater Flexibility for Advanced Projects
As students become more familiar with digital fabrication, they can move from simple cutouts to more complicated mechanical assemblies, custom instrument housings, and experimental equipment. A versatile CO2 laser cutter makes it easier to support this progression, particularly in schools with established STEM programs and makerspaces.
Of course, the right machine also depends on the available workspace, budget, cutting area, and required material thickness. Schools should consider these factors before deciding which laser cutter best fits their needs.

Recommended OMTech Laser Cutters for Teaching Physics
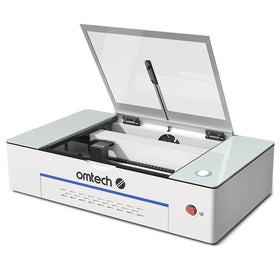
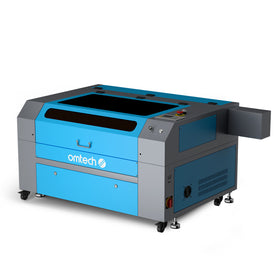
If you are looking for a laser cutter to introduce more practical physics activities into your classroom, many OMTech CO2 laser engravers meet the criteria. Two options that educators may want to explore are the Polar Lite 55W Desktop CO2 Laser Engraver and Cutter and the Pronto 40 90W CO2 Laser Engraver and Cutter.
OMTech Polar Lite 55W Desktop CO2 Laser Engraver and Cutter
The OMTech Polar Lite 55W is a compact desktop laser cutter that offers a convenient option for schools, small makerspaces, and educational workshops.
With a 55W CO2 laser tube and a working area of 20.1 × 11.8 inches, it provides enough space to produce many of the smaller components used in classroom physics projects. For example, educators can use it to fabricate wooden bridge components, gear assemblies, pendulum frames, and custom holders for optical experiments.
- The machine also supports cutting and engraving materials such as wood and acrylic, giving students the flexibility to experiment with different designs and material properties.
- Its one-click autofocus feature helps simplify the setup process, while the front and rear pass-through openings provide additional flexibility when working with longer materials.
For schools that want to introduce digital fabrication without dedicating a large industrial workspace to the equipment, the Polar Lite is a practical starting point.
OMTech Pronto 40 90W CO2 Laser Engraver and Cutter
For schools with larger makerspaces, more frequent production requirements, or more advanced fabrication projects, the OMTech Pronto 40 90W is another option worth considering. This machine features a 90W CO2 laser and a 24 × 35-inch working area, providing considerably more room for larger components and multiple parts in a single cutting session.
- The larger working area is particularly useful when students are working on projects involving structural assemblies, larger mechanical models, or multiple sets of experimental components.
- For example, educators can prepare several bridge-building kits, gear assemblies, or instrument enclosures without having to divide every design into smaller sections.
The Pronto 40 also features autofocus, which helps simplify material positioning and machine setup. For schools that expect to use their laser cutter regularly across different classes and educational programs, the larger working area and higher laser power offer additional flexibility.
Both machines can support a variety of educational projects. The best choice depends on the size of the projects, the number of students using the equipment, and the school's available workspace and budget.
Discover the OMTech Education Program
Bringing laser cutting technology into a classroom can be a valuable investment, particularly for schools looking to expand their STEM, engineering, and makerspace programs. However, educators do not have to approach this investment without support.
Through the OMTech Education Program, verified educational institutions can access special discounts on selected laser machines. Depending on the machine and order quantity, eligible schools can receive discounts ranging from 5% to 20%.
The program also supports schools, makerspaces, and universities looking to introduce digital fabrication into their educational activities.
Whether you are setting up a new makerspace or expanding an existing STEM program, OMTech provides an opportunity to bring practical laser cutting technology into your learning environment. Educators interested in the program can visit the OMTech Education Program page to learn more about eligibility and available offers.
 Final Thoughts
Teaching physics does not always have to involve textbooks, equations, and classroom demonstrations. While these remain important parts of learning, students often develop a better understanding of difficult concepts when they can see how they work in the real world.
With the right equipment and a little creativity, educators can make physics lessons more interactive while introducing students to valuable design, engineering, and manufacturing skills.
If you are considering adding a laser cutter to your classroom or makerspace, explore OMTech's range of laser machines and take advantage of the available educational support through the OMTech Education Program. You may also be interested in this complete guide on classroom laser cutting applications for teachers.