


Rotary Attachments | Buying Guide
A rotary axis—often called a rotary attachment or rotary chuck—is a key add-on for CO2 and fiber laser systems when you need to engrave or mark cylindrical, tapered, or irregular items that can’t sit flat. By rotating the workpiece during the job, it allows the laser to produce smooth, continuous wraparound graphics around the full circumference.
Key Factors to Consider
When selecting a rotary axis for your OMTech laser machine, use the factors below to confirm compatibility and get the best performance for your specific applications:
1. Compatibility
Controller Compatibility: The rotary axis must work with your machine’s controller board. CO2 lasers commonly use controllers such as Ruida, Trocen, or TopWisdom, while fiber lasers typically run EZCAD-based controllers. Make sure the controller supports rotary mode and has the correct ports and firmware to drive the rotary axis.
Software Support: Confirm that your laser software—such as LightBurn, RDWorks, or EZCAD—fully supports rotary operation. You should be able to set critical parameters like diameter, circumference, and steps-per-rotation to maintain accuracy.
Wiring & Connectors: Check that the rotary attachment’s connector matches your machine’s stepper-motor wiring harness. Depending on the setup, you may need an adapter or small wiring changes to achieve a proper connection.
Motor Driver Compatibility: Some rotary units include an integrated motor driver, while others depend on your laser’s existing driver. Verify the driver’s current output aligns with the rotary motor’s requirements to avoid poor performance or damage.
2. Types of Rotary Axis
There are two main rotary attachment styles, and each is built for different use cases:
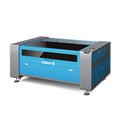
A. Chuck Rotary (see Fig. 1)
Best for: Cylindrical items with different diameters, including mugs, bottles, tumblers, pens, and small pipes.
Key Features: Uses a lathe-style chuck to grip parts from the inside or the outside, delivering strong, secure clamping. This design provides high precision and is particularly suitable for heavier or irregularly shaped objects.
Things to Consider: Each piece needs to be centered and clamped by hand, which can add to setup time.
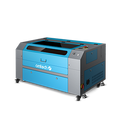
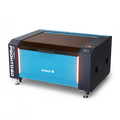
B. Roller Rotary (see Fig. 2)
Best for: Cylindrical items in a range of lengths—especially delicate, lightweight, or hard-to-clamp pieces—such as glasses, long tubes, and candles.
Key Features: The workpiece sits on two or more rollers that spin it during engraving. Roller units are often faster to stage for runs of identical parts—place the item on the rollers and begin.
Things to Consider: Roller rotaries work best when the item is perfectly round. Tapered edges, handles, or uneven surfaces may rotate inconsistently and often require careful leveling. Very smooth or heavy pieces can also slip if friction or support is insufficient.

|
 |
| 1: Chuck Rotary | 2: Roller Rotary |
3. Object Size and Weight Capacity
Diameter Range: Confirm the minimum and maximum diameters the rotary can handle. Some chuck-style units have a narrower range and may not securely grip very small or very large items.
Length Capacity: Consider the overall length of your workpiece and verify it fits within your machine’s work area once installed on the rotary. Oversized parts may not spin correctly or could interfere with laser head travel.
Weight Capacity: Make sure the rotary can carry your heaviest parts without slipping, sagging, or overloading the motor. This matters even more for metal items or large glassware.
By matching these considerations to your project requirements and your laser’s specifications, you can choose a rotary axis that expands your machine’s versatility and opens up more engraving options.
OMTech Rotary Attachments for CO2 Lasers
|
Rotary Axis |
65mm Rotary Axis Attachment for CO2 Laser Engraver |
70mm Rotary Axis Attachment for CO2 Laser Engraver | 130mm Rotary Axis Attachment for CO2 Laser Engraver |
|
Size |
Base Area: 49 x 15 cm |
Dimensions: 50x26x18 cm |
Dimensions: 38x15.5x8 cm |
|
Weight |
Net Weight: 6 kg |
Net Weight: 9 kg |
Net Weight: 2 kg |
| Best Suited for |
Irregularly shaped cylindrical objects such as cups, bottles, tubes, pipes, bowls, and more
Fig. 3: 4-Wheel Rotary & Goblet on a CO2 Laser |
Irregularly shaped cylindrical objects such as cups, bottles, tubes, pipes, bowls, and more
Fig. 4: Jaw Chuck Roller & Mug on a CO2 Laser |
Evenly cylindrical objects such as handleless bottles, cups, pipes, tubes, and more Fig. 5: CO2 Laser | Roller & Cups |
|
Object Diameter Range |
✅ Engraving Length: 5-35 cm ✅ Engraving Diameter: 1-15 cm |
✅ Engraving Length: 2-22 cm ✅ Engraving Diameter: 0.5-8 cm |
✅ Engraving Diameter: 3-13 cm |
|
Compatible Machines |
Turbo-Serie; Max-Serie; Pronto-Serie; Pro-Serie; Polar Lite-Serie | Turbo-Serie; Max-Serie; Pronto-Serie; Pro-Serie; Polar Lite-Serie | Turbo-Serie; Max-Serie; Pronto-Serie; Pro-Serie; Polar Lite-Serie |


Setting Up
Step 1. Locate the Y-Axis Port
Identify the Y-axis connection port on your laser machine. It’s usually on the right side of the system, near the plug for the Y-axis motor cable.
Step 2. Disconnect the Y-Axis (see Fig. 6)
Carefully unplug the cable currently connected to the Y-axis port. This cable normally drives the laser head’s forward-and-back motion.
Step 3. Connect the Rotary Device (see Fig. 7 & 8)
Insert the rotary attachment’s cable into the now-open Y-axis port, and confirm the connector is fully seated and secure.
Step 4. Position the Laser Head
Manually place the laser head exactly above the location where your workpiece will sit on the rotary. Do this before you connect the rotary attachment, because the Y-axis will be disabled afterward.
Important: After the rotary axis is connected, Y-axis travel is disabled—you won’t be able to move the laser head forward or backward. Confirm the head is correctly positioned in both X and Y before you proceed.

|
 |
 |
|
CO2 Laser | Disconnect the Y-Axis |
CO2 Laser | Connect the Rotary Device (1) |
CO2 Laser | Connect the Rotary Device (2) |
Here is a video tutorial on how to set up the rotary attachment for your OMTech CO2 laser machine:
https://youtu.be/QwJYUqtE67E
OMTech Rotary Attachments for Fiber Lasers
| Rotary Axis | 80mm 3-Jaw Rotary Axis for Irregular-Shaped Objects | 70mm Rotary Axis Attachment for Fiber Laser Engraver |
|
Size |
21 × 12 × 16.5 cm |
12 × 8 × 9 cm |
|
Weight |
Net Weight: 4.8 kg |
Net Weight: 2.1 kg |
|
Best Suited for |
Rings, bracelets, pens, bottles, tubes |
Bottles, rings, bracelets, and more |
|
Object Diameter Range |
✅ Inward Clamping Range: 2–63 mm ✅ Outward Tightening Range: 25–70 mm |
✅ Max Engraving Diameter: 89 mm |
|
Compatible Machines |
Split fiber lasers |
All fiber lasers |
Setting Up
Step 1. Connect the Rotary Attachment
Find the rotary port on the rear of your fiber laser. Take the standard 4-pin plug from your chuck rotary and push it firmly into the port. Ensure the connection is snug to prevent unplugging during a run.
Step 2. Position Under the Lens
With the rotary connected, place it carefully directly under the laser lens. Center the rotary as accurately as possible to maximize engraving precision.
Step 3. Adjust Clamps for Object Stability
The side clamps on the rotary can be moved inward or outward to hold the part securely. Set the clamps to match the diameter and shape of the cylinder you’re engraving so it won’t slip while rotating.
Step 4. Tilt Adjustment for Tapered Objects (Essential for Cups and Bottles)
This rotary includes a tilt mechanism that lets you angle the workpiece up or down. This is critical for tapered items like cups or bottles, so the engraving surface stays level and parallel to the laser lens. Correct leveling maintains consistent focus and produces uniform results around the full circumference.
Leveling a Tapered Object (e.g., a cup)
Load Object: Place the cup into the rotary clamps carefully and tighten it securely.
Check Level: Use a physical level or the laser’s red-light preview to confirm the engraving surface is perfectly level relative to the lens.
Adjust Tilt: If it isn’t level, loosen the tilt adjustment, gently tilt the rotary up or down, and re-check until the surface is centered and level.
Secure Position: Once the cup is level, tighten the bolts or locking mechanisms to lock the tilt angle in place.

|
 |
 |
 |
|
Fiber Laser | Connect the Rotary Attachment |
Fiber Laser | Adjust Clamps |
Fiber Laser | Tilt Adjustment |
Fiber Laser | Final Product |
Here is a video tutorial on how to set up the rotary attachment for your OMTech fiber laser machine:
https://youtu.be/WiR9DyoNuoI


